
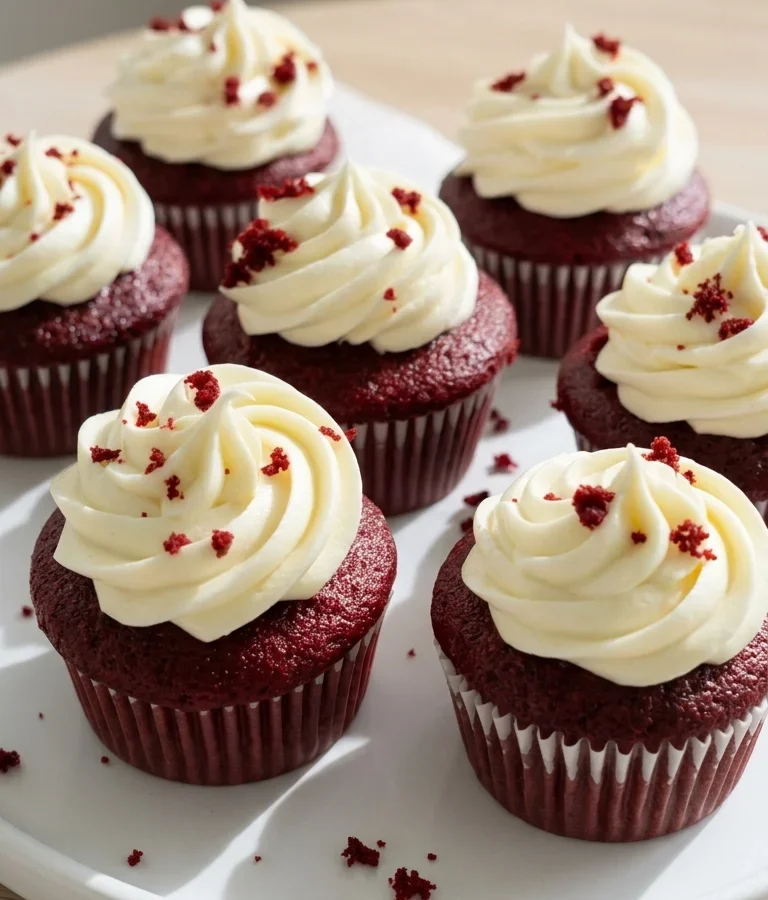
There is nothing quite like a perfectly baked red velvet cupcake. Unlike standard chocolate or vanilla, these treats feature a beautifully delicate crumb and a subtle hint of cocoa that pairs beautifully with tangy frosting. This recipe delivers incredibly moist results every time, topped with a stable, pipeable cream cheese swirl that looks like it came straight from a bakery display case.
Why You'll Love This Recipe
- Unbelievably moist and tender crumb texture, thanks to the combination of vegetable oil and buttermilk.
- Perfectly balanced flavor profile that blends a subtle hint of cocoa with a signature buttermilk tang.
- Sturdy cream cheese frosting that holds its shape beautifully for elegant, professional-looking piping.
- A clever decoration trick using a tiny bit of saved cupcake crumb as a gorgeous, zero-waste garnish.
Ingredients You'll Need (and Why)
Buttermilk: The natural acid in buttermilk is the secret to tenderizing the gluten in the flour, which creates the incredibly soft, velvety crumb texture that defines red velvet.
White distilled vinegar: Vinegar reacts with the baking soda to give the cupcakes a wonderful rise, while also helping to preserve and brighten the vibrant red color of the batter.
Unsweetened cocoa powder: We use just a tablespoon here because classic red velvet is not meant to be a heavy chocolate cake; it needs only a mild cocoa undertone to complement the vanilla.
Red gel food coloring: Gel food color is highly concentrated, allowing you to achieve a brilliant, deep red shade without introducing excess water to your batter chemistry.
Cream cheese: Be sure to use traditional brick-style cream cheese rather than a tub spread. The bricks have a lower water content, ensuring your frosting remains thick and pipeable.
How to Make It
Mix the Liquid Base
Unlike standard vanilla cakes that rely on creaming solid butter, red velvet cupcakes start with an oil-based mixture. This ensures they stay exceptionally moist for days. Whisking all of the wet ingredients together first—including your sugar, egg, buttermilk, and red coloring—makes certain that the color is completely and evenly distributed before you add the delicate dry components.
Incorporate the Sifted Dry Ingredients
Sifting your flour and cocoa powder directly into the bowl is a critical step to prevent stubborn clumps from forming in your batter. Once sifted, switch to a gentle hand-whisking motion. Stop mixing the very instant you no longer see pockets of dry flour; over-mixing develops the gluten in the flour, which will turn your light, velvety cupcakes dense and rubbery.
Bake and Cool Thoroughly
Divide the batter evenly among your twelve liners, making sure not to fill them more than two-thirds full so they bake with flat, uniform tops. Let them bake until a toothpick comes out clean. It is absolutely vital that the cupcakes cool completely to room temperature on a wire rack before you begin frosting. If the cupcakes are even slightly warm, your beautiful frosting will slide right off.
Whip and Pipe the Frosting
For a silky-smooth cream cheese frosting, ensure both your butter and cream cheese are fully softened to room temperature so they emulsify without any lumps. Once whipped until fluffy, gradually mix in the powdered sugar. Transfer the frosting to a piping bag fitted with a large star tip to pipe dramatic, bakery-style swirls over each cupcake, finishing with fine red crumbs for that signature look.
Success Tips
- Bring your eggs, buttermilk, butter, and cream cheese to room temperature before starting; cold ingredients will not emulsify smoothly and can cause your frosting to look curdled.
- Always sift your cocoa powder. Cocoa is naturally prone to clumping, and sifting is the only way to avoid dark chocolate spots in your finished red velvet batter.
- Avoid over-baking your cupcakes. Check them at the 18-minute mark with a toothpick; they should be soft and springy to the touch.
- If your kitchen is warm and the cream cheese frosting feels a bit soft after mixing, pop the filled piping bag into the refrigerator for 10 to 15 minutes to firm up before piping.
Variations
- Natural Food Dye: Swap out the red gel coloring for 1 to 2 tablespoons of natural beet juice powder if you prefer an alternative to artificial dyes.
Storage & Make-Ahead
Fridge: Keep the frosted cupcakes in an airtight container in the refrigerator for up to 3 to 4 days. For the best flavor and texture, let them sit at room temperature for 15-20 minutes before serving.
Freezer: You can freeze unfrosted cupcakes wrapped securely in plastic wrap for up to 2 months. Thaw at room temperature before frosting.
FAQ
Can I use regular milk if I do not have buttermilk?
Buttermilk is essential for the chemistry of this recipe. If you do not have any, you can make a quick homemade alternative by adding 1/2 tablespoon of lemon juice or white vinegar to 1/2 cup of whole milk. Let it stand for 5 minutes until slightly curdled before using.
Why did my cream cheese frosting turn out runny?
This is usually caused by using tub cream cheese instead of brick-style cream cheese, or because the butter and cream cheese were too warm when beaten. Try adding a bit more powdered sugar, or chill the frosting in the fridge for 20-30 minutes to help it firm up.
What does the vinegar do in the cupcake batter?
Vinegar reacts with the baking soda to release carbon dioxide, which gives the cupcakes their light, airy rise. It also works to preserve the bright red color of the food dye during the baking process.