By Harry Cruse | TasteSavory
The “cold pan method” has surged in popularity across culinary forums, social media, and home cooking circles as a supposed foolproof hack for achieving ultra-crispy, golden chicken skin without burning or sticking. Inspired by traditional duck breast rendering techniques, the approach flips classic pan-searing rules on their head: instead of dropping protein into a screeching-hot, oiled skillet, you place seasoned chicken skin-side down into a stone-cold pan and slowly bring the heat up together.
However, as home cooks frequently discover, putting this technique into practice can sometimes lead to sticky pans, torn skin, or unevenly cooked meat. Is the cold pan method a genuine culinary breakthrough or an overhyped myth? This guide breaks down how the technique works, why it succeeds or fails, and how to execute it properly for perfectly rendered, crispy chicken thighs every single time.
The short answer
- Yes, the cold pan method works: It excels at slowly rendering out sub-cutaneous fat under the skin, allowing it to fry in its own natural grease without burning or drying out.
- Cookware matters: It works best in heavy cast iron, carbon steel, or well-seasoned pans. Stainless steel requires lower heat management and strict patience.
- Skin-on is required: The method relies entirely on fat rendering. Skinless thighs or lean cuts will stick and tear without an added fat barrier.
- Dryness is essential: Surface moisture creates steam, which prevents browning and causes proteins to stick aggressively to metal surfaces.
- Patience is key: The chicken will not release from the pan until the fat has fully rendered and a golden, caramelized crust has formed.
The Science Behind the Cold Pan Technique
To understand why the cold pan method works, it helps to contrast it with a traditional hot pan sear. In a traditional sear, high heat instantly coagulates surface proteins and browns the exterior via the Maillard reaction. While this works brilliantly for lean cuts like tenderloin or chicken breast, fatty cuts with thick skin present a different challenge: the skin can burn on the outside before the thick layer of fat underneath has time to render, leaving behind a rubbery, chewy texture.
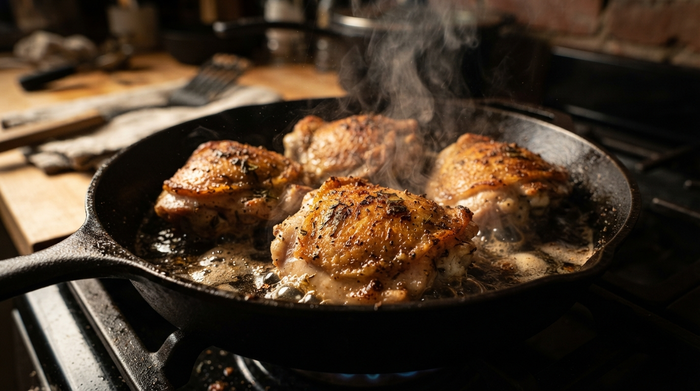
Starting in a cold skillet allows the fat to melt gradually as the temperature rises. As the liquid fat renders out, it forms an active, natural grease barrier between the chicken skin and the metal surface. Once the fat has rendered and the temperature reaches browning range, the skin crisps up evenly in its own rendered oil, yielding a crackling-thin crust and juicy meat.
Why the Method Fails (and How to Fix It)
When home cooks experience sticking or tough, dry meat using the cold pan approach, it usually comes down to a few common execution mistakes:
1. Excessive Surface Moisture
Moisture is the enemy of browning and non-stick release. When wet chicken hits a pan, water turns into steam, lowering the local temperature and causing meat proteins to bond with microscopic pores in the metal pan. Always pat the chicken skin thoroughly dry with paper towels before cooking. For optimal results, salt the chicken and let it air-dry uncovered on a rack in the refrigerator for a few hours prior to cooking.
2. Heat Setting Is Too High
Stove dials vary wildly between gas, electric coil, and induction cooktops. Setting your burner to “medium” (or 5 out of 10) on a high-BTU gas range or an induction element can quickly overheat the pan before the fat has rendered. Start over medium-low or low heat (around 3 or 4 out of 10) to give the fat sufficient time to liquefy and coat the bottom of the pan.
3. Using Lean or Skinless Cuts
The cold pan method relies entirely on rendering fat to coat the pan. Skinless chicken thighs or boneless skinless breasts lack the sub-cutaneous fat layer needed to create a grease barrier. If cooking skinless cuts, always preheat your pan with added oil or fat rather than starting cold.
4. Attempting to Move the Meat Too Soon
Stainless steel naturally holds onto protein until the Maillard reaction finishes forming a caramelized crust. If you attempt to lift or flip the chicken while it is still adhering to the pan, the skin will tear. Wait until the rendered fat is bubbling steadily and the edges of the skin show a clear golden ring; the chicken will naturally release when it is ready.
Step-by-Step: Perfect Cold Pan Chicken Thighs
| Step | Action | Key Detail |
|---|---|---|
| 1. Dry & Season | Pat skin thoroughly dry; salt generously. | Air-drying in the fridge for 30 minutes improves crispness. |
| 2. Cold Placement | Place skin-side down in a cold, unheated pan. | Optional: add a tiny drop of high-heat oil as insurance. |
| 3. Low Start | Set burner to medium-low (3 to 4 out of 10). | Allow fat to render out over 10–12 minutes. |
| 4. The Release | Wait for natural release before flipping. | Jiggle the pan lightly; do not force or chisel the skin. |
| 5. Finish Cooking | Flip skin-side up and finish on stove or in oven. | Roast at 400°F (200°C) until internal temp reaches 175°F (79°C). |
For more details on internal cooking temperatures and technique, consult our detailed guide on 15 ways to cook chicken every home cook should know and learn how to keep chicken juicy and tender across various cooking methods.
Choosing the Right Cookware
While the cold pan method works in multiple cookware types, performance varies across materials:
- Cast Iron & Carbon Steel: The best choices for cold starting. Their naturally seasoned surfaces provide extra release assurance while retaining steady, gentle heat.
- Stainless Steel: Highly effective for creating rich, flavorful pan sauces (fond), but requires strict heat control and patience so the skin releases cleanly without sticking.
- Non-Stick Cookware: Easy and forgiving for beginners, though it produces slightly less dramatic crust formation compared to raw metal pans.
If you want to build a balanced cookware setup for all your weeknight meals, review our essential recommendations on essential kitchen tools every home cook needs.
Frequently Asked Questions
Should I add oil to a cold pan when cooking chicken thighs?
While true enthusiasts use no added oil, spreading a thin coating of high-smoke-point oil (like avocado or canola oil) in the cold pan acts as an excellent safety net without harming the crisping process.
Does the cold pan method work for chicken breasts?
No. Chicken breasts are too lean and lack the thick fat layer needed for rendering. Breast meat benefits far more from a quick sear in a preheated, oiled skillet or gentle baking.
Why is my chicken thigh skin rubbery instead of crispy?
Rubbery skin means the fat did not fully render out, usually because the heat was too high or the cooking time was too short. Keep the heat low and allow the fat time to liquefy fully.
To what internal temperature should chicken thighs be cooked?
While poultry is safe at 165°F (74°C), chicken thighs taste best and stay tender when cooked to an internal temperature of 175°F–185°F (79°C–85°C), as this higher temperature fully softens the connective tissue. Measure accurately using an instant-read thermometer.
Conclusion
The cold pan chicken thigh method is far from a myth—it is a scientifically sound technique that delivers remarkably crispy skin when executed with correct heat management and patience. By starting with dry, skin-on thighs over low heat, allowing the fat to render naturally, and resisting the urge to move the meat before it releases, you can master this effortless technique in any home kitchen.